Sourdough Buns

Sourdough Buns

These buns are so good! They are perfect for pulled meat sandwiches or burgers and even a side roll with dinner. I love the crumb and flavor with these.

Recipe

1/2 cup starter

2 cups coconut milk

2 tablespoons coconut oil

2 teaspoons sea salt

6 cups white wheat flour or more if needed.

Mix together the starter, coconut milk, oil and salt in a large bowl. You could also use 2 cups water and 1/2 coconut milk powder. Add half the flour and mix well. Add the remaining flour and mix by hand until fully incorporated and the dough is tacky. If the dough is still too wet add a little more flour 1/4 cup at a time. Cover the bowl with plastic wrap and let rise on the counter for 12 to 24 hours.

Once the bread has risen and ready to shape, use avocado or coconut oil to oil the counter. Cut the dough into 14 large round balls about 1/4 cup or so each. Pinch the dough together at the bottom of the roll. You could also make more by making them smaller.

Sourdough Buns 2

Let rise for 1-2 hours until they have doubled in size and are nice a big. Cut the bread to vent and spread the rolls with melted butter. Bake at 375 degrees for 35 minutes.

Caring For Your Natural Yeast Starter

sourdough starter 1

It is amazing to me that I have been able to keep my natural yeast starter alive for years. I learned a few tricks that make it easier and happy to share them with you.  I bought my starter from a friend who bought it from another friend who said it is a strain that is over 200 years old from Czechoslovakia.  Take it for what it’s worth, my experience has been that this is the best mild tasting natural yeast I have ever baked with.

*

First, my starter is fed with organic bread flour. You could use an organic all-purpose flour too. I have tried other grains and it just doesn’t do as well. White flour is best.

*

Second, when adding water to your yeast you must never use chlorinated water. This kills the yeast over time. If all you have is chlorinated tap water let it sit on your counter for 24 hours so the chlorine dissipates.

*

Before each use stir your starter.  If you haven’t used it in a while pour off the liquid (ethanol) and scrape off any gray dough. Stir and use. If it has been a month (or two) between uses consider taking out ½ cup, discard the rest, and feed with 2 cups flour and 2 cups water to renew and boost. (You may need to transfer to a bowl). Leave on the counter overnight, it should bubble up and smell good. From there you can use it. Do not keep your starter in any metal container. Glass or ceramic is best. Before each use it is best to remove it from the fridge and allow to come to room temperature before using.

*

Feed it after each use. Make it thick enough so a stirring stick or spoon can stand on it’s own so it has plenty of food to eat and keep in the fridge. I make 6 loaves of bread at a time when baking for just my family. This takes out 1 and 1/2 cups of the starter from the jar. I usually feed it 1 cup water and 1 and a half cups flour to make it thick. The measurements do not have to be exact. I put plastic wrap over mine because it does need some air to grow unlike other fermented foods. From the picture above you can see that I have removed the rubber liner on my large jar. I allow the lid to sit un-closed on the jar and place in the fridge.

If you need a large amount of starter, place 2 cups starter into a large bowl and feed with 4 cups water and 4 cups flour. Let sit on the counter overnight. If you need more feed again in equal ratios and then use when nice and bubbly and hungry.

*

If you are interested in purchasing some of my sourdough starter in a quart sized Mason jar for $10 send me a message from my contact page. Starters are for sale for pick up only in Utah.

Thanksgiving Dinner Menu

Thanksgiving Spread

Here is a list of all our favorite Thanksgiving recipes in one place. Starters, desserts, sides and of course the turkey! We also like to serve cranberry juice, white grape juice, eggnog and raspberry jello with fresh raspberries inside and out, topped with whip cream.

Perfect Thanksgiving Turkey

Cranberry Relish

Batter Rolls

Stuffing

Sweet Potato Casserole

Fluffy Mashed Potatoes

French Green Beans with Caramelized Onions

Rosemary Glazed Carrots

Mom’s Clam Dip

Homemade Cheese Ball

Veggie Tray with Organic Ranch Dip

Pumpkin Pie

Brown Bag Apple Pie

Chocolate Caramel Silk Pie

Raspberry Chiffon Pie


Thanksgiving Stuffing with Sourdough Bread

Stuffing 3

I love this side for Thanksgiving or Christmas dinner because I cook it in the crock pot, making it an easy side to leave for the most part to do its thing. You can use french or sourdough bread. I like to use my sourdough bread recipe.  It isn’t Thanksgiving dinner until I start smelling the butter, veggies and sage sauteing together! Yum!

Recipe

1 loaf of bread cubed into bite size pieces

2 onions diced

4 stalks of celery chopped

handful of fresh sage, chopped

1/2 cup butter

1/2 cup dried cranberries

Sea salt and pepper

In a large skillet saute the onions, celery and sage with the butter, salt and pepper, stirring occasionally until the onions become translucent.

stuffing 2

Add the cranberries and cook for another minute. Place the cubed bread into the slow cooker with the onion mixture.  Distribute 1/2 cup chicken stock over the bread and toss to coat.

stuffing 1

Cook on low for 5-6 hours stirring every hour to prevent any burning. If it dries out too much add a bit more chicken stock. Serve warm.

Jalapeno Cheddar Corn Bread

Jalapeno Cheddar Corn Bread

I usually make these when I have company because they are so rich!  This dense bread is full of flavor and a little kick!  The recipe is from Barefoot Contessa’s cookbook titled “At Home”, but I use buttermilk instead to give it a better flavor.

Recipe

3 cups all-purpose flour

1 cup organic yellow cornmeal

1/4 cup sugar

2 tablespoons baking powder

2 teaspoons sea salt

2 cups buttermilk

3 extra-large eggs

1/2 pound (2 sticks) butter, melted

8 ounces aged sharp cheddar cheese, shredded

1/3 cup chopped scallions and extra for topping

3 tablespoons jalapeno peppers, seeded and minced

Grease a 9x13x2 -inch baking pan and preheat oven to 350 degrees.  Combine flour, cornmeal, sugar, baking powder, and salt in a large bowl.   In a separate bowl mix together the buttermilk, eggs and butter.  Add the wet ingredients to the dry and mix until most the lumps are dissolved.  Mix in 2 cups of the grated cheddar cheese, scallions and jalapenos.  Place in the pan and let sit for 20 minutes at room temperature.  Sprinkle remaining cheese on the batter and a few scallions.  Bake for 30-35 minutes until a toothpick comes out clean.  Cool and cut into large pieces.  Serve warm or at room temperature with soup/chili, grilled chicken and/or a salad.

Natural Yeast Sourdough Boule

Sourdough Bread

I love baking with natural yeast. In a recent study done out of Italy, found that before wheat had gone through a fermented process the gluten content was 75,000 ppm. After a 12-24 rise the gluten content went down to 12 ppm.  In order for something to be considered gluten free the ppm have to be below 20.  This bread is easy to digest and contains living beneficial bacteria. It is a great option for those with diabetes and other autoimmune issues. This recipe makes 2 loaves and are 70% hydration.

Recipe

1/2 cup natural yeast starter or 100 grams

2  1/4 cups purified water or 540 grams

2 tablespoons olive oil (optional) or 45 grams

2  1/2 teaspoons sea salt or 18 grams

6 cups bread flour or 800 grams

*Side note: if you want to add any other flavors you can easily add 1 tablespoon of a seasoning for each loaf. Honey is also an option, about 1/4 cup for every 2 loaves.

Mix the starter, oil (if using), salt and water together with a Danish dough hook in a large glass or stainless-steel bowl.  Add half the flour and stir. Add the rest of the flour and mix by hand.  Cover with plastic wrap and let rest for 30 minutes. Do one stretch and fold, gently to create a smooth ball and build structure.  Let rise for 12 -16 hours depending on the temp of your dough and house. When the bulk ferment is finished the dough should jiggle and have large bubbles. Divide dough in half. (about 1.5 pound loaves). Shape and place in banneton basket or bowl lined with a floured tea towel. You can let rise and bake or place covered in the fridge for another 12 to 24 hours.

When ready to bake without placing in the fridge, place on parchment or inside banneton basket and let rise for 1-2 more hours until doubled in size. Heat Dutch oven with the oven at 450. Remove plastic wrap, place on parchment paper and cut the bread with a sharp knife or lame in slits or an cross shape about a 1/2 inch deep at a 45-degree angle.  Once the Dutch oven is hot, take it out of the oven and place the parchment with bread on top inside the ditch oven. Place the lid on and bake for 2 0minutes.  Remove lid and bake for 30minutes more. If you would like a crispier crust place just the loaf back in the oven for another 10 minutes. Best served with Irish butter!

Natural Yeast Whole Grain Sandwich Bread with Cinnamon Roll Option

rp_Natural-Yeast-Sandwich-Bread-300x225.jpg

For over a year now we have been making all of our own bread with natural yeast. When I say we I mean me and the kids. They love to help and do a pretty great job of it too. When I learned the importance of allowing bread to rise naturally with natural yeast I didn’t look back. The benefits of natural yeast are so beneficial you may also just want to use it exclusively too. Without getting to technical the natural yeast process  triggers phytic acid to release all the nutrients in the grain it is holding onto so it becomes more available for us to digest. It doesn’t do this when it goes through a faster rising process, especially if dry active yeast is used. The bread must rise at least 6 hours for the phytic acid to get the message from an enzyme called phytase to let go of the nutrients.  Once it does and once you eat it, it goes looking for free radicals in the body. So that’s pretty cool!  The bacteria that have developed in the bread release spores when the bread goes in to the oven and then hatch and repopulate after it is baked.  Our bread contains natural probiotics! It is also a low glycemic food so it won’t spike insulin for those with diabetes. Recent research has shown that when we allow our bread to rise for 12 – 24 hours it takes the gluten content down from up to 70,000 ppm to 12 ppm. In order for something to be considered gluten free it has to be under 20 ppm.  The study can be found in the article below.
https://wholegrainscouncil.org/blog/2012/01/research-sheds-light-gluten-issues?fbclid=IwAR0hBRfliHhSAN7P-k5dyKT7u6LbIyZE9pWj6kVGR8eufXGFkuuNcN-EPnE

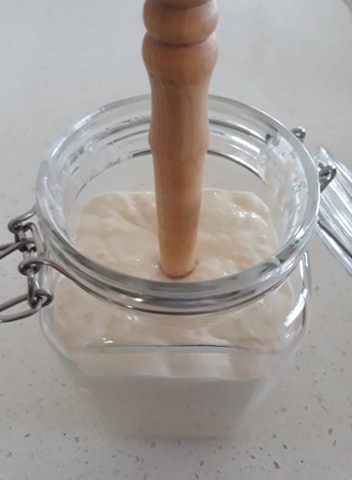
There are a few tips that will help your natural yeast experience be a positive one. First, do not feed your starter with water that contains chlorine, this includes filtered water from the fridge. If all you have is fridge or tap water leave the amount of water you need on the counter for an hour and then use.  I can’t tell you how many people have come to me asking for another start because they killed their yeast due to chlorine poisoning. Second, always feed your starter with a little extra flour (yes I use white wheat flour for my start, it’s always happier) to make it thick enough for a spoon to stand up on it’s own in the jar.  Always feed your starter right after you use it and then put it back in the fridge.  Use flour that is free of glyphosate as much as possible. It’s just better for your health. The flour I use is the kind I sell on my website under the food storage tab. And finally don’t give up. Be patient with yourself and your starter. It takes time to build up the good yeast spores in your kitchen. If you need to jump start your starter take out a little (1/4 – 1/2 cup) and add 2 cups water and 2 cups flour in a bowl and leave on the counter over night. It should bubble up and have a pleasant smell to it.  Then you are free to use it, feed again and place back in the fridge.  I’m always open to questions if you have any!

Recipe

Makes 4 loaves or 2 loaves sandwich bread and 2 dozen cinnamon rolls.

1 cup starter

4 cups purified water

4 teaspoon sea salt

1/2 cup avocado oil or coconut oil

1 cup honey

6 cups Spelt, Einkorn, Khorasan or whole wheat flour freshly milled

7 cups whole white wheat flour (this is what I sell when I place my food orders)

In a large stainless steel or glass bowl mix together the starter, water, salt, oil and honey. Then add the whole grain flour of your choice and mix with a Danish dough hook or other large whisk. Add the last 7 cups of flour and mix the rest by hand until everything is incorporated. It doesn’t need to  be kneaded, the fermentation process does all the work for you.  Place plastic wrap over the bowl and let rise for at least 12 hours and up to 24 hours. I have found that the longer the rise up to 24 hours the better.

First rise Sourdough Sandwich bread

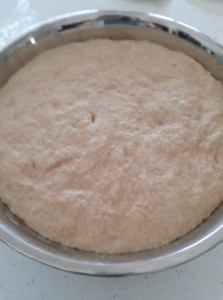
Here you can see the bread has risen and more than doubled in size after 20 hours. Oil the surface of your counter with avocado or coconut oil and pull the bread out of the bowl.  Cut the bread into 4 equal pieces. Shape each piece into a rectangle with your hands by patting and spreading. I don’t use a rolling pin ever. Roll up and place in a greased loaf pan, covered and allow to rise for 2-3 hours until doubled in size.

Second Rise Nautral Yeast Sandwich Bread

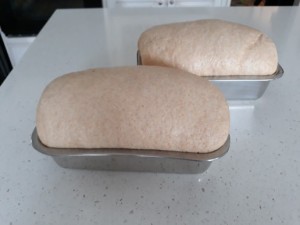
Once the bread has risen until doubled in size heat the oven to 350 degrees. Bake for 45 minutes and then pull our of the pans and place onto cooling racks. Bag up the bread when the loaves have completely cooled.

Cinnamon Rolls Option

For the cinnamon rolls you will want to cut the bread in half right after the first rise. Make two loaves of bread with the other half and roll out the second half into a large rectangle shape about 1/2 inch thick.

Cinnamon Rolls with filling

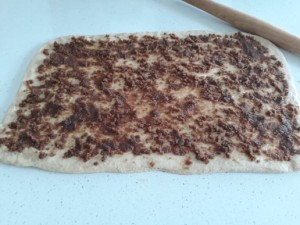
For the filling melt 1 stick of butter or 1/2 cup coconut oil and add 1 cup of brown sugar or 1 cup coconut sugar with 1 tablespoon cinnamon in a bowl. Spread on the dough and roll up into a long log shape.

Cinnamon Rolls rolled up

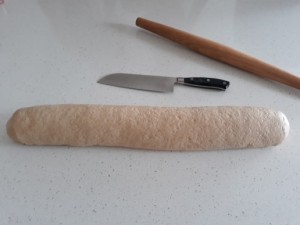
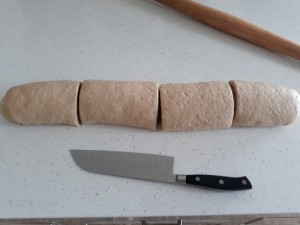
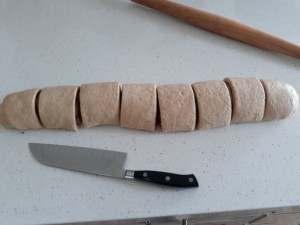
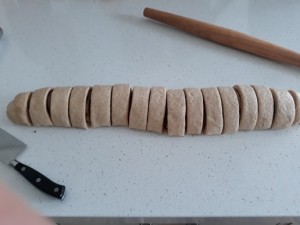
Cut into 24 slices by starting with a center cut and going out adding more from there as illustrated in the pictures below.

Cinnamon Rolls Cut 1

Cinnamon Rolls Cut 2

Cinnamon Rolls Cut 3

Cinnamon rolls on pan

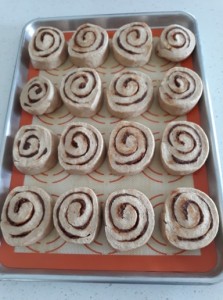
Place on a rimmed baking sheet and let rise, covered until double 3-4 hours.

Second Rise Natural Yeast Cinnamon Rolls

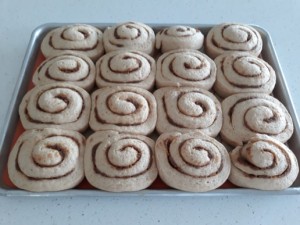
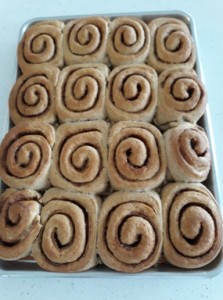
Bake in the oven at 350 degrees for 30-35 minutes until the tops are a light golden brown color.

Natural Yeast Cinnamon Rolls Baked

While the rolls are cooling prepare the cream cheese frosting by mixing together one 8 ounce block of cream cheese, 1 teaspoon vanilla extract and 3 cups powdered sugar.

Nautral Yeast Cinnamon Rolls with Cream Cheese Frosting

Spread on the rolls and enjoy!

Gluten Free Chocolate Waffles

Gluten Free Chocolate Waffles

These are the perfect Valentines or Birthday Breakfast!  My kids beg for them! Serve with fresh fruit and real maple syrup. Makes 4-6 round waffles.

Recipe

2 cups almond flour

2 cups tapioca flour

1/4 cup organic cacao or cocoa powder

2 teaspoons baking powder

1/2 teaspoon sea salt

1/2 cup applesauce

4 eggs

1/2 cup almond or coconut milk, more if you want the batter thinner

3 tablespoons maple syrup

1 teaspoon vanilla

Mix the dry ingredients together first then add the rest. Cook according to your waffle iron instructions. Serve with maple syrup and fresh fruit.

Oatmeal Protein Pancakes with Fruit Sauce

Oatmeal Protein Pancakes with Fruit Sauce
We make these at our house at least once a week for breakfast.  You don’t need a food grinder to grind the oatmeal, a blender will do.  We love using blended fresh/frozen fruit instead of sugary syrup.  It definitely makes it a healthier breakfast!

Recipe

3 cups regular rolled oats, blended

1/2 cup natural plant or whey protein powder

2 tablespoons coconut sugar or brown sugar if you like

2 teaspoons baking powder

1/2 teaspoon baking soda

1/2 teaspoon sea salt

2 cups water or milk

1 egg

3-4 tablespoons melted coconut oil

Whisk all fry ingredients together first in a large bowl.  Add the water, oil and egg.  Heat up your griddle and cook on a greased surface.  For the sauce we like to blend together 1 cup water, 1 banana, 1/2 cup applesauce, handful of frozen peaches and a handful of frozen strawberries.  Enjoy!


Whole Wheat or Spelt Sourdough Bread

Whole Wheat Sourdough Bread

This recipe is very versatile.   You can add just about anything to it.  I like to add a few tablespoons fresh chopped rosemary.  You can add cheese or garlic or both.  Try making a sweet version by adding a few tablespoons of honey and pecans, white chocolate chips and cranberries.  There are so many things you can do!

Recipe

1/2 cup natural yeast starter

2 1/2 cups room temp water (if using tap water allow the chlorine to dissipate by letting it sit on the counter for 1 hour)

2 tablespoons olive oil

2 teaspoons sea salt

2 cups whole wheat flour or spelt

4-5 cups bread flour

Make the dough the night before you plan on baking.  You can make this by hand or in an electric bowl.  Whisk together starter, water, oil and salt.  Add the 2 cups whole wheat or spelt flour.  If using an electric mixer switch to a dough hook.  Add the remaining flour.  Make sure the dough pulls away from the bowl or is tacky but not sticky.  If it needs more flour add 1/2 cup at a time.  Place the dough in a large glass bowl and cover with plastic wrap.  Let stand for 10 -24 hours.  On a well oiled surface divide the dough in half.  Make a boule shape by pulling the edges of the dough circle towards the center, tucking under as you go.  Place the boule onto a piece of parchment paper and set inside a small skillet pan.  Cover with plastic wrap and let rise until double, about 1-2 hours.

Just before baking, preheat a large dutch oven in the oven to 500 degrees.  Slash the dough with an X with a sharp knife or razor blade and sprinkle with flour.  Place the parchment and loaf in the large dutch oven.  Cover with lid and turn the oven down to 425 degrees.  Bake for 30 minutes.  Remove lid and bake for 20 more minutes.  Let cool and serve with your favorite soup or other dish!