Rose and Lavender Facial and Hand Cream

Rose and Lavender Facial and Hand cream 1

This luxurious cream is heavenly! It is very hydrating, calming and great to use just before bedtime! The rose is a natural astringent and pH balancer and the lavender is cleansing and calming. This makes for great gifts and is simple to make. I like to get my ingredients from Bulk Apothecary or Whole Sale Supplies Plus, both online.

Recipe

16 oz sweet almond oil or another moisturizing oil of choice (you can infuse it with dried lavender flower buds by heating over the stove top on very low heat for an hour, then strain).
4 oz beeswax or 1/2 cup either shredded or use the beads.
16 oz rose water
20-30 drops lavender essential oil
20 drops vitamin E oil

Rose and Lavender Facial and Hand cream

Melt the beeswax and oil together. Bring to room temperature or just until it starts to set up (this part is really important). While waiting for the oil to cool, add the essential oil and vitamin E. Once cooled almost to room temp immediately pour the rose water into the oil mixture and blend with an immersion blender until thick and creamy. Pour into bottles or jars. Label and date. Keep in the fridge for long term storage.


Sore Muscle and Bruise Lotion

Sore Muscle lotion 1

This rich and soothing lotion is wonderful for massage or every day use. Be careful not to use on broken skin because it does contain the arnica plant and can poison the blood.  You can make any kind of lotion with the basics of this recipe. Use whatever kind of oil, liquid and beeswax.

Recipe

Arnica herb oil 1

Make a solar infused oil with equal parts fresh arnica flowers and leaves, dried lavender flower buds, dried marshmallow leaves, dried calendula flowers and fresh dandelion flowers.

Arnica herb oil 2

Cover with olive oil and a lid. Be sure to label. Place outside in the sun for 2 – 4 weeks. If you are in a rush, use the stove top method by heating the herbs and oil over very low heat for an hour, be careful not to burn them. Strain through a mesh cloth and strainer. For every cup of infused oil you will need 1/4 cup or 2 oz beeswax melted with the oil. Allow the oil and beeswax to come to room temperature or until it just starts to set up.

Sore Muscle lotion

At this point you can either use equal parts oil and purified water or an herbal infused tea (say for example, calendula tea). Immediately mix with an immersion blender until creamy.  Add essential oils of your liking. I like to use 40 drops of rosemary and lavender as they are also helpful for tense muscles.  Add 20-30 drops  vitamin E oil as a preservative.  Use a large syringe to squirt into bottles or jars. Label and date. Keep in the fridge for long term storage.

Black Drawing Salve

Black Drawing Salve

This salve is wonderful for drawing out an kind of infection or poison from insect bites especially. It is safe to use on animals as well.

Recipe

The first step is to make an oil infusion. This can be done either outside in the sun or over the stove top.
Solar or stove top infuse dried calendula flowers and dried plantain leaves. Place equal amounts of the herbs in a jar or small pot. Cover with 18 – 20 oz of olive oil, make sure the herbs are covered and place outside in the sun for 2 – 4 weeks. If you need it faster infuse the herbs is the same amount of oil over the stove top on very low heat for about an hour, be careful not to burn the herbs. Strain the herbs.  You should measure out 18 oz infused oil for this recipe.

For the salve you will need:
18 oz. infused calendula and plantain oil
2 oz coconut oil
4-5 oz or (1/2 cup) beeswax shredded or beads depending on how hard you want the salve to be.
4 tablespoons activated charcoal
4 tablespoons Bentonite clay
30 drops tea tree essential oil
30 drops lavender essential oil
20 drops vitamin E oil

Melt the coconut oil and beeswax with the infused oil. Test the salve to make sure it is set enough to your liking by placing some in a spoon and placing in the freezer for 2 minutes.  If it is set enough turn off the heat and add the remaining ingredients.  If not add a little more beeswax. Quickly pour into tins or jars before setting up. You can always heat it slightly to melt down if it sets up too fast. Label and date.  Keep in the fridge for long term storage.

Ear Ache Oil

rp_Earache-oil-223x300.jpg

This ear oil is fabulous and very simple, especially if you grow all the herbs listed yourself! It works really well when alternated with freshly squeezed onion juice.

Recipe

ear oil 3rp_ear-oil-2-168x300.jpg

Place equal amounts of fresh mullein flower, fresh or dried calendula flower, fresh St. John’s Wort flower and fresh chopped garlic in a small jar. Cover with olive oil by an inch or two. Cover and set outside to solar infuse for 2-4 weeks or place in a small pot over very low heat for one hour or until fragrant, be careful not to burn. Strain and pour into dropper bottle. Label and date. Keep in the fridge and warm under hot water before use.  Place 2-3 drops in the ear 3 times a day, alternating with freshly grated onion juice. This has worked very well for my family.

Homemade Cold Processed Soap

Homemade Cold Pressed Soap
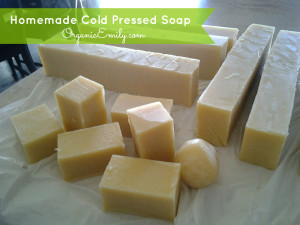
A friend of mine taught me how to make cold processed soap about 5 years ago and I have been making it ever since for family and friends.  This is a variation of the recipe she used and I have loved it ever since!  It lathers and cleans very well.  You can use whatever essential oils you like.  I like to use a combination of peppermint, lavender and rosemary or tea tree.

So what is soap and how is it made?  Simply put, it is a chemical reaction  between lye (sodium hydroxide) and fat (animal or plant based, usually oils) called saponification.  When mixed together in just the right amounts, it forms a salt or soap!  Hisotrically, soap was made from rendering animal fat and adding natural lye (leached from ashes) to make soap.  There were no calculators or scales way back in the day so they would add more lye to the soap just in case so it would set up.  This irritated or burned the skin sometimes, but it was better than using to little and letting the oils separate leaving all their hard work  to go to waste.  We don’t have to worry about that today with scales and calculators.  When made correctly there shouldn’t be any lye remaining in the soap.  That’s the beauty of saponification!

Here are a few resources I like to go to for supplies and recipes.

The first website is great for recipes and lye calculator  http://pinemeadows.net/

The second is great for oils, lye and molds http://wholesalesuppliesplus.com/

The third source available locally is Jone’s Bees in Salt Lake City (2586 w. 500 s.) for lye and other oils

Supplies

One large glass bowl or heat resistant plastic bowl (for lye)
One very large metal pot for gently heating oils
One scale (preferably electric)
One electric blending stick or wooden spoon
One instant read thermometer
Rubber Gloves
Goggles
Newspaper/paper towels to put down on your counter to protect it from lye
molds to pour soap (I used a cardboard box lined with a large garbage bag)
Vinegar, in case lye gets on your skin and you need to relieve the burn


Recipe

40 oz. coconut oil
32 oz. palm oil
24 oz. olive oil
12 oz. avocado, grape seed or jojoba oil
4 oz. cocoa butter
16 oz. lye (sodium hydroxide)
52 oz. distilled water
1.5 oz essential oils (optional)

Put on your gloves and goggles with newspaper under the counter to protect it from the chemical reaction between lye and water.

*Warning!!! Always add lye to liquid, NOT liquid to lye!!!

Measure by weight in your scale the right amount of water, put it into bowl, then measure lye and carefully add to water. Mix with wooden spoon thoroughly, (open a window to allow airflow from fumes) and set aside.

Measure oils by weight and place in pot over a very low heat just until melted. You can use the blending stick to help break up the oils. Be careful to do it slowly and do not raise temp higher than lye temp mixture.

Check the temp of both lye and oil separately of course. When both are in between 125`- 100` then they are ready to come together. (Keep them as close together in temp as possible) Carefully add your lye mixture to the oil mixture without splashing. (I actually used a very large 6 gallon bucket) Start to mix thoroughly with blending stick or wooden spoon, (perfect time to add essential oils) until it starts to trail (leaving a trail of soap behind when it drizzles off the spoon). It will harden quickly! When this happens it is ready to pour, again be careful not to splash. Cover soap with plastic wrap and blankets to keep from cooling to quickly. Soap should be ready to cut within 24-48 hours. Once cut stack on a cooling rack allowing for air flow. Do not use soap for 4-6 weeks while it cures. Enjoy! Let me know if you have any questions. ! 🙂


Simplified Recipe

41 oz. coconut oil

47 oz. olive oil

47 oz. palm or palm kernel oil

20 oz. lye

47 oz. water

Follow the same directions as above.  Makes about 40 regular size bars.

Herbal Burn and Wound Salve

Homemade Wound and Burn SalveThis is one of those homemade medicinal concoctions that work really well and is very helpful to know in case you can’t get immediate medical attention.  It’s perfect for cuts, scrapes, burns and more.  There are a few steps you have to take before applying the burn/wound salve itself if you are dealing with deep cuts.

First thing you need to do is to stop the bleeding with cayenne pepper.  Cayenne is an amazing herb and should be in everyone’s first aid kits!  It increases circulation inside the body, but stops bleeding outside of it!  Depending on how deep the cut is, the sting of applying cayenne pepper to the injury may or may not hurt.  My little 3 year old has received some pretty deep cuts the last 2 years from playing rough with her siblings.  We applied the cayenne (powder) to stop the bleeding first (which by the way also disinfects) and then reapplied the salve 3x a day.  She healed very well with no scars!

Recipe

The wound salve has equal parts of 3 ingredients;

Fresh leaves (if available) or dried root of the comfrey plant.   Comfrey  is also known as “knit bone”, it has been used to close wounds and heal broken bones for many years.  If you don’t grow comfrey you can use powdered comfrey root from any health food store.

Wheat germ oil helps to promote new cell growth aiding in the healing process to prevent scarring.

Honey has been used to aid with burns for many years.  It is a natural antibiotic and reduces inflammation.

You can make any adjustsments with the recipe to make a thick salve.

Blend all ingredients together if using fresh comfrey leaves or just a fork if using the powdered root of comfrey.  Keep in an airtight container and refridgerate.  It will stay good for one month.

Peppermint Lip Balm

Peppermint Lip BalmI have made my own lip balm for over a year now and struggled with finding a really good recipe.  My friend Cynthia Bee was sweet enough to share her recipe with me.  I love the smooth feel of this lip balm and the versatile options with different kinds of oils and butters.  I’ll give you the basic recipe and then break it down into exact proportions as I made it.  The place to get great product at an inexpensive price is www.wholesalesuppliesplus.com

Basic Recipe

40% liquid oil like castor, bubasu, almond or olive oil.  I recommend using a combination of two.  Castor oil is thicker and gives a nice sheen.

25% shea or mango butter

20% shredded beeswax

15% brittle butter like cocoa butter

How I did it:

Ingredients for Peppermint Lip Balm

1/4 cup olive oil

1/4 cup castor oil

1/4 cup + 1 tablespoon mango butter

1/4 cup shredded beeswax

3 tablespoon shredded cocoa butter

Pinch of colored mineral (optional)

1-2 drops essential oil of your choice for every .5 oz container

2 drops vitamin E oil added at the end to help preserve the lip balm

Melt all ingredients in a small sauce pan over low heat until all oils and beeswax is melted and combined.  Add the mineral color if using.  Use a medicine syringe to fill the small half ounce containers or lip balm tubes and then add the essential oil per container.  Let the balm set and then cover with lid.

Medicinal Skin Salve

Herbal Skin SalveThis salve is made from oil that has been infused with St. John’s Wort, Comfrey and Calendula herbs.  Each of these herbs has many wonderful skin healing properties including cuts, scrapes, stings, bruises, burns, sore muscles, diaper rash, cradle cap and more!  It is so simple to make and can be given as fabulous gifts too!  You can read about the specific medicinal properties of these herbs below.  If you like other herbs and want to use them instead, by all means do what works for you!  That is the beauty of this recipe!

comfrey

calendula

St. John’s Wort

Solar Infusing Oils for Homemade Skin Salve

From left to right: Calendula, Comfrey, St. John’s Wort

The first step is to infuse the oils!

Place fresh or dried herbs into pint or quart jars (depending on how much you want to make) and cover the herbs by an inch.

Cover the jars with lids and set out on a warm sunny porch or sunny window seal in the winter.

Allow to infuse in the sunlight for 2-4 weeks.

Dry herbs are best to use so that moisture doesn’t get into the oil.  Although, there are some herbs that need to be used fresh like the flowers and buds of St. John’s Wort.  If you do use fresh and see moisture develop at the top of the inside of the bottle just open it up and wipe it away with a clean paper towel.

Try making a double strength salve by straining  the first batch, placing the infused oil back into the jar and then adding more of the same herb starting the process all over again.

Salve Recipe

Once the oils are infused, measure the amount you have.

For every cup of oil you will add 1/4 cup shredded beeswax.

Melt the beeswax with the oil in a saucepan until melted.

Test the salve to make sure it is the consistency you want by spooning a little bit and placing into the freezer for a minute so it sets up fast.  If you want it more solid add more beeswax.  If you want it softer, add more oil.

Pour the liquid salve into a jar ( I get mine at Industrial Container and Supply).

Before it sets up ( and it will do it quickly) add 1 drop of vitamin E oil for every ounce.

Also add 2 drops essential oil for every ounce.  I like to use lavender and tea tree oil for their medicinal properties.  They compliment the salve very well!

The vitamin E oil will help preserve the salve longer as well as keeping it in the fridge too!

Growing and Using Medicinal Herbs: Comfrey

Comfrey Plant

Comfrey is a wonderful herb with  multiple benefits!  The plant is very easy to grow and can be harvested multiple times a season.  It grows well in full sun and well draining soil.  One of my favorite comfrey products I use is a salve called Dr. Christopher’s Complete Bone and Tissue for all my physical aliments!  It contains comfrey and other herbs.  It is simply magical!  As a fitness instructor for over 10 years who teaches multiple classes a week my body has begun to… well let’s say get a little older and over used so to speak.  I have a bulging lower disc in my spine, knee pain and a weak rotator cuff.  Whenever anything starts to flare up I put the salve on a few times a day and within a couple days I am back to normal again!  I cannot say enough about comfrey!

Medical Benefits of Comfrey

  • Comfrey is good for fracture healing and bone lesions.
  • Comfrey is beneficial for treatment of muscle tears, sprains, strains, and dislocations.
  • Comfrey helps in arthritic conditions of bursitis, tendinitis, and torticollis.
  • Comfrey treats arthritis such as rheumatoid arthritis and osteoarthritis.
  • Comfrey is good for treating bunions and deformities of extremities.
  • Comfrey helps in treating intervertebral disc lesions and herniated discs.
  • Comfrey is good for circulatory system and improves poor circulation and varices.
  • Comfrey treats skin deformities like minor wounds, minor burns, fistulas, and psoriasis.
  • There are millions of comfrey natural products available in the market, the most prominent of which is comfrey gel which helps in treatment of some types of eczema, cracks in breasts, and varicose ulcers
  • For more info go here

Harvesting Comfrey

  • Here is an excellent video on how to harvest comfrey!

There is controversy over whether comfrey should be ingested or not.  Studies have shown that comfrey taken internally can be dangerous due to it’s high levels of alkaloids, potentially harming the liver.  However, the studies are a bit misleading in my opinion.  They do show that the alkaloids could be dangerous, but that is because very large amounts were taken internally.  More so than what the average person would normally ingest, however it is important to use caution.  I know many people who have taken it internally and are just fine.

Dried Comfrey

You can make a basic salve recipe with the dried comfrey leaves and roots.  Anytime you use a root over the leaf or flower of the plant it will always have stronger constituents.

Comfrey Oil

 The first step in making your own medicinal salve is to make a solar infused herb oil.  This can even be done with herbs for cooking.  Fill a clean and dry wide mouth jar with dried herb leaves or roots.  Cover with 2 inches of good olive oil.  Cover tightly and allow to sit in a warm sunny spot for 2-4 weeks.  The longer you allow it to sit the stronger it will become.  You might expect the oils to go rancid, however as long as the herbs are infusing the oils they won’t due to the antioxidant properties found naturally in plants.

Straining Herbs 1

 Strain the herbs through a sieve after the oil has been infused.

Straining Herbs 2

Strain further into a cheese cloth or piece of muslin.  Be sure to squeeze the last bits of oil from the drained herbs into the bowl.

Homemade Salve

Now the salve is ready to be made!


Basic Salve Recipe


For each cup of infused herb oil, add 1/4 cup (finely chopped or shredded) beeswax.  Heat the oil and beeswax together over very low heat, stirring occasionally, until the beeswax has melted.


To ensure the salve is the thickness you desire, place 1 tablespoon of the mixture onto a spoon and put in the freezer for a minute or two.  Then check for firmness of the salve.  Add more beeswax if you desire a more firm ointment.  For a softer salve add more oil.


Once the mixture is the consistency you want pour immediately into small glass jars or tins.  Be careful the oil is extremely hot!  I get me supplies from here.


Store salve in a cool, dark place, where it will keep for several months.  Add essential oils to enhance aroma and medicinal purposes.


DIY Rose Water

Old Fashioned Rose

It’s that time of year I yearn for throughout the winter months when the roses and the peonies bloom!  Rosa Rugosa is a beautiful rose that produces rose hips, or fruit from the rose after blooming.  I intentionally purchased this particular shrub because of the color and the availability to use the hips for jelly and other purposes.  Rose hips are very high in Vitamin C, in fact they contain 50% more than oranges!  Rose hips are also used in tea to relieve constipation.  More on the benefits and uses of rose hips later when I can harvest them!

While the blooms are big and beautiful I like to harvest a few cups to make rose water!  I use rose water as a natural toner for my face and body after cleansing.  There are many other reasons why a person would use it, here are just a few:

  • Rose water is a gentle astringent safe enough for acne prone, oily or aging skin by reducing inflammation and redness caused by enlarged capillaries.  It has also been tested to bring the Ph levels back to normal so the oil glands don’t have to over produce causing further problems.
  • Rose water used as a warm tea infusion for the bath can help reduce general stress but also abdominal stress, specifically for those who suffer from bladder infections.
  • When sprayed on hair it has been known to increase blood flow to the scalp to nourish and strengthen hair follicles and prevent hair loss.
  • Rose water is also high in Vitamin C, A, D B3 and E.  Improving the overall health of skin and hair.


Rose Petals


How To Make Your Own Rose Water

  • Gather 1 cup packed fresh organic rose water.
  • Wash with purified water to clean any insects or dirt off.
  • Bring 2 cups distilled or purified water to a boil.


Steeping Rose Petals

  • Take the pan away from the heat and place the rose petals inside.  Cover with a lid for 30 minutes allowing the rose petals to steep and the water to take on the color and oils of the roses.


Straining Rose Petals

  • Strain the roses through a sieve and squeeze all the remaining water and color out of the petals.
  • Strain a second time through muslin or cheese cloth.


Rose Water Bottle

  • Store cooled rose water in a spray bottle.
  • Keep in the fridge for up to 1 week or place a few drops of lavender essential oil to help preserve longer.
  • Other natural additives may be 3-4 drops vegetable glycerin for hydration, 1/2 tsp almond oil or other favorite essential oil.